Merry Christmas everyone! This post is part of the MVP Advent Calendar Initiative brought to you by Megan Walker. If you haven’t signed up yet and want more gifts all the way up until Christmas, do so here. My gift to you is about how to use my favorite data transport tool and and a small help “script” to get you started. Since I’m lazy by nature I can ensure you that this tool keeps my efforts to a minimum and still gets the job done well. Intrigued? Well – let’s have a look!
Shuffle Builder and Shuffle Runner
The tool I’m talking about is actually not a tool. It’s two. Shuffle Runner is the tool that actually transports the data between environments. Shuffle Builder is the easy to use, no-code tool that helps you build the definition on what data you want to transport, in what order, by what filters, with what relationships etc. Both are XrmToolBox tools but are not available in the regular Tool Library inside of the application. So how do you get it?
Dowload the Tool
Navigate here where you can download it. Right click on the zipfile and choose to unblock it before you unzip it. After you’ve unziped it, take the .dll and navigate to your XrmToolBox folder.

In your XrmToolBox folder there should be another folder called Plugins (if there is not, create one). Put the .dll in the Plugins-folder and tadaa! You got two new tools in your toolbox.

My Use Case
In all type of CDS projects I find myself having configuration data I want to transport between environments (Development, Test, Production, Training). Configuration data can be entities like Subjects, Categories, Schedule board Settings and so on. These entities also often have relationships between each other that I need transferred too. My example for you today will be to transport Knowledge Articles and Categories and the relationship between the two. Note that this relationship is a many to many relationship. Not many data transport tools can handle these types of relationships – that is partly why I love this tool!
Shuffle Builder
Let’s start by opening the Shuffle Builder tool. This is where we put together our definition of what entities, what attributes and in what way we want our data to be transported.
We create our definition in the treeview to the left and add details in the top window in the middle. The first thing we do is choose if we want to use Shuffle to transport Solutions or Data. In our scenario we want data, but if you have a scenario where you have multiple solutions that need deployed in a certain order this tool can help you with that too.

After we’ve defined our Block type we choose our Entity we want to transfer, name it so it looks readable in the treeview to the left and choose Type: Entity. Next step is to define what we wan’t to export and how we want to import data from this entity.

Export
In the Export section you need to choose what Attribute to export, if you want and only export certain records and if you care to sort them. You can do all this by using FetchXML and the FetchXML Builder tool too, but for now we will just do it in this interface.

When you decide what to attribute to export you want to make sure you don’t choose the “createdon” and other similar fields. That would make the Shuffle fail. If this is a custom entity or you’ve added several custom fields to an entity you can include all attributes with your prefix by doing this:

In this case I just want title, content, statuscode (if I want this field I always need to add statecode too) and keywords, so I add all of these from the picklist. If I decide I need more fields later I can add them to me definition later and re-shuffle the same data.

In this example I will also add a filter – so I only export my published articles and none of the ones in draft.

Even here I get help from a picklist on what attributes I can choose to filter on from the Knowledge Article.

Import
Import options are many! First of all – I can choose to create my records with the same ID. This was particular useful when you had workflows with lookups populated – then your workflows would deploy without errors since the GUID matched.
I also need to decide in what way I want my records to be saved, if I want to update inactive records and update identical records.
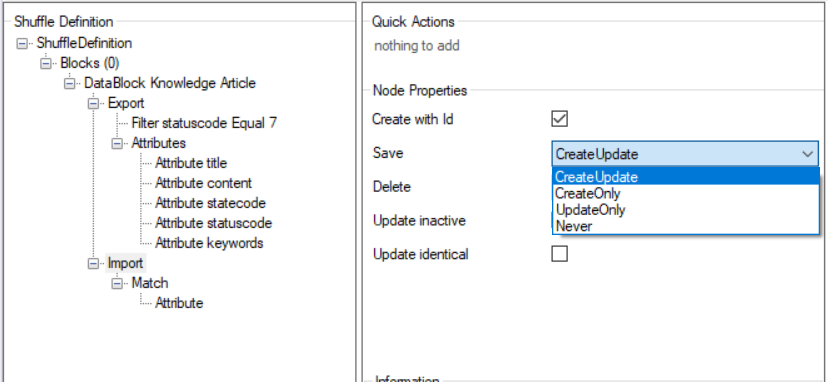
But the most interesting part of the Import is the Match option. I can choose to match on one or several attributes, and since I have the “Create with ID” option I can also choose to match on the ID on import.
In our case it’s enough to match on the Knowledge Articles title. If that is the same – I want that record in the target environment to be updated instead of it creating a new one. Cool right?

I do the same type of definition for the Category entity – before I move on the the many to many-relationship.
N:N Relationship transfer
Note that before you are able to transfer a relationship with Shuffle, you need to have both entities from that relationship, defined earlier in the definition. If you already have a complete set of records of one of the entities – you still need to add it in your definition and you can choose Import Save option to “Never”. That way the definition still knows how you want to match those records, but without updating anything in your target environment.
I start by adding another Data-block and instead of choosing type “Entity”, I choose “Intersect”. I choose my Intersect entity and under intersect name I add the name of the relationship between the two entities.

My Export attributes needs to be the two ID’s from the related entities. In my case categoryid and knowledgearticleid.

The Import option doesn’t need any details – but when I add the Import option I get the Match and first attribute added automatically. Just delete this part of the tree view when importing N:N Relationships.

Save your definition and click Do the Shuffle! in the menu at the top.

Shuffle Runner
When Shuffle Runner opens up, it is already prepped with your definition from the Builder. Let’s start with Exporting our data – choose a type (I usually go with “Simple”) and then click the big button — Shuffle –. In the Log-part you can see how many of each of the records that you’ve gotten exported according to the definition.

Open a new tab with the Shuffle Runner that is connected to your target environment or just change connection on your Shuffle Runner tab. Make sure you switch to the Import action before again – hitting the big beutiful button — Shuffle —.

In the log you see if records been created or updated, if something failed and how many.
Navigation to my target environment I can see my articles and categories, and also that the relation between the two are set as they were in the environment I exported from.

Attributes like content, title, keywords and statuscode are all as expected in my target environment. Worth noting is that images and other formatting is of course also transported.

My gift
My gift is this instruction and my example definition that you can open with the Shuffle Builder and change and use as you wish. I hope you will fall in love with this tool as much as I have!
Merry Christmas!


Hi Sara – thanks for this gift 🙂 Wanted to check what is the maximum number of records that can be transported at given time with this plugin?
LikeLike
Hi Anwesha!
I haven’t hit any limit of records when using this. I usually divide my shuffle definitions to maybe be up to 10-15 entities or smaller in one script just because I don’t want to run through all entities every time I need to update something.
I asked one of the developers who said: Either there is a limit at 5000 records, or it’s unlimited. I Don’t know.
So if you try it and hit a limit, let me know!
LikeLike